Sample S3 Repository Plugin
What You Need
- A setup instance of our .NET RESTful Engine
- If you haven't setup your engine yet, follow the instructions in the article above. Shut down the engine after you set it up.
- A version of the Sample S3 Repository Plugin project
- An S3 Bucket
- An AWS DynamoDB Table
- AWS Access Key and AWS Secret Key
Setting Up The S3 Bucket
Create an S3 Bucket, but add these two folders in the bucket:
- "Templates"
- "Documents"
The S3 Bucket is now setup properly to use with this sample.
Setting up the AWS DynamoDB Table
Create a new DynamoDB table. You can name it whatever you want, but add "Guid" as the partition key as shown below:
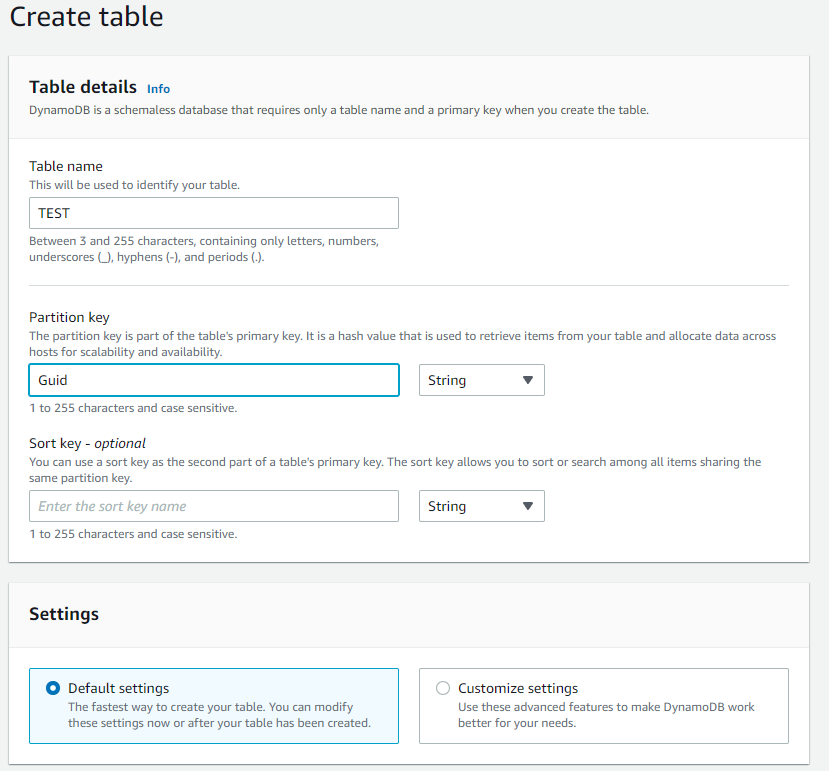
Once that is setup, click "Create". Your DynamoDB table is now setup properly to use with this sample.
Steps For Usage
After downloading the sample project off of github, and setting up the S3 Bucket and DynamoDB table as described above, follow these steps to setup the sample project and then using it in your RESTful Engine.
Setting Up Sample Project
- If you haven't already, shut down your installed instance of the RESTful engine.
- Open SampleRESTfulS3Plugin.sln in Visual Studio. We need to add references to two DLLs that are provided with your installation of the RESTful Engine (they will be in C:\inetpub\wwwroot\RESTfulEngine\bin):
- WindwardModels.dll
- WindwardRepository.dll
- To do this, right click on
SampleRESTfulS3Pluginproject in the Solution Explorer in Visual Studio. Then go toAdd -> Reference...as shown below:
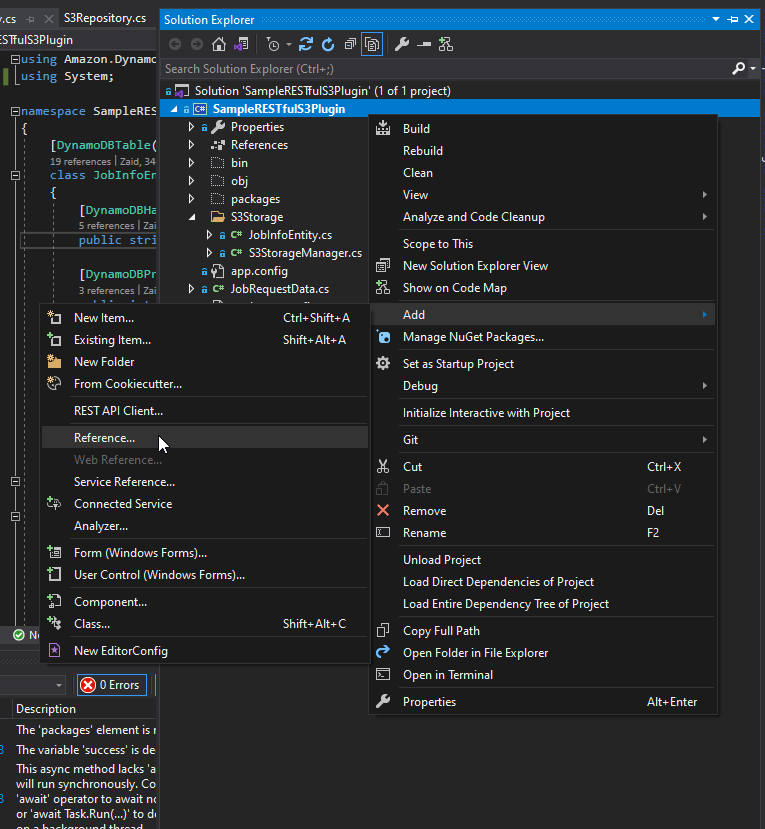
- Add a reference to both the dlls mentioned above. This is what it looks like when you have the references added:

- Next, we will add your AWS credentials to the project. Open the
S3Repository.csfile and enter your S3 bucket name, AWS Access Key, and AWS Secret Key:

- Navigate to
JobInfoEntity.cs, located in theS3Storagedirectory:

- There you will set the name of your DynamoDB table as shown below:

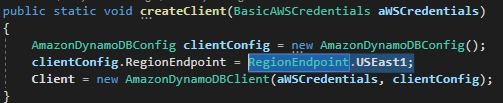
- Now, we will make sure that the RegionEndpoint is set correctly in the project. Change RegionEndpoint to match the region that your S3 Table is deployed. If your S3 table is not deployed in
US.East1, then you will need to set the proper region in thecreateClient()method inS3StorageManager.csfile:
- Build the project and use the generated DLL in the RESTful Engine.
You can setup this project wherever you want, but your RESTful server must be able to access the DLL. If you build the project somewhere other than your RESTful server, make sure you place the dlls on your RESTful server.
Using DLL in RESTful Engine
You will need to get the full path to the SampleRESTfulS3Plugin.dll that was generated by the build in step 9. The DLL will be in the following directory:
...\.NET-RESTful-S3-Repository-Sample\SampleRESTfulS3Plugin\bin\Debug
Once you've got the full path, append it to the following line of code (where it says full path to dll):
<add key="repository" value="{FULL_PATH_TO_DLL}!SampleRESTfulS3Plugin.S3Repository"/>
Then you will need to add this to the appSettings part of the Web.config file for your RESTful Engine. You should be good to start up your RESTful engine now and start sending requests to it. Make sure you have logging turned on to catch any exceptions that might be thrown. Set the following line in the Web.config to true:
<log4net debug="true">
You also need to copy 3 AWS DLLs from your project to your RESTful Engine bin folder. Navigate to the \bin\Debug directory in your SampleRESTfulS3Plugin project directory. In there you will find the following DLLs:
- AWSSDK.Core.dll
- AWSSDK.DynamoDBv2.dll
- AWSSDK.S3.dll
Copy these three DLLs into the bin directory of your RESTful engine. Now you should be able to use the S3PluginRepo with your RESTful engine.